
Follow these steps to set up your headset:

|
1. Log into Varjo Account Portal
|

|
2. Download Varjo Base from Varjo Account Portal
After the support for XR-3 and VR-3 headsets ends on January 1, 2026, you can continue to use your headset with Varjo Base versions 3.0-4.14. If you want to extend compatibility, read more about the Extended compatibility package for XR-3, VR-3, and Varjo Aero. When you install Varjo Base for the first time, you may be prompted to also install Microsoft Visual C++ 2019 X64 Minimum Runtime. |
|
3. Start Varjo Base
When you start Varjo Base for the first time, we will run a system check to confirm that your computer is compatible with the headset. See System requirements for more information. |

|
4. Optional: Log into Varjo Base with your Varjo Account
|

|
5. Select your headset model
Select your headset model to view detailed instructions on how to connect your headset. |
A.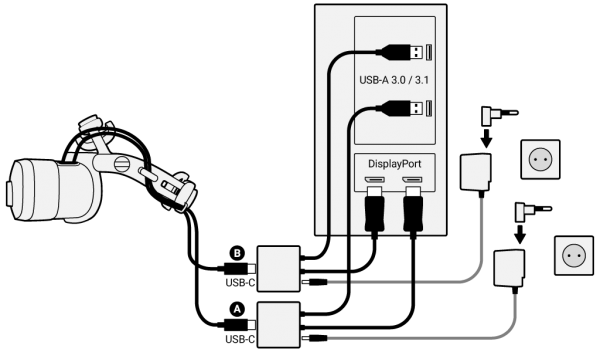 B. 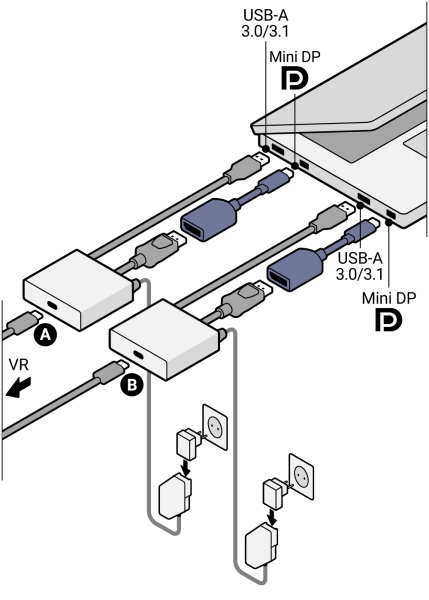 C. 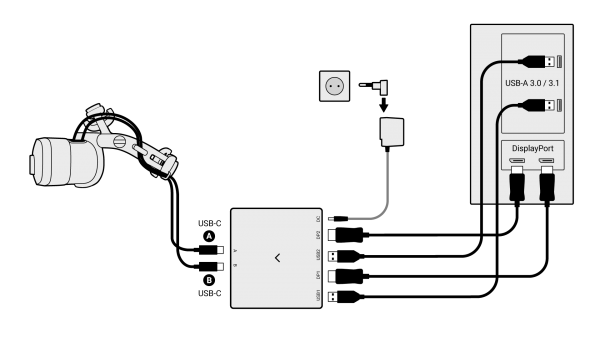 D. 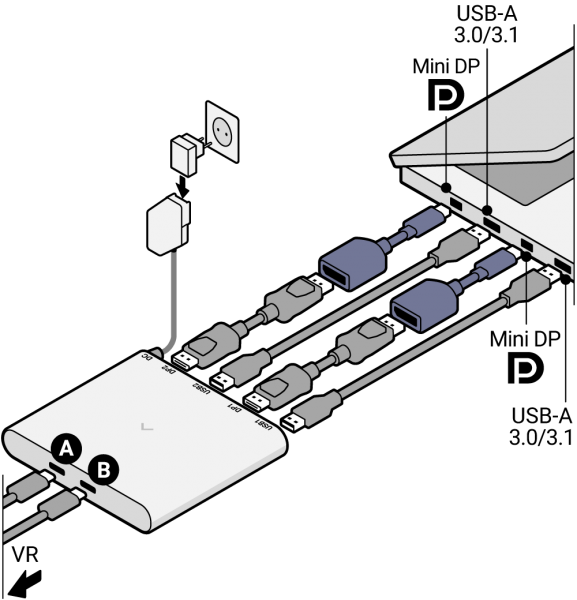 E. 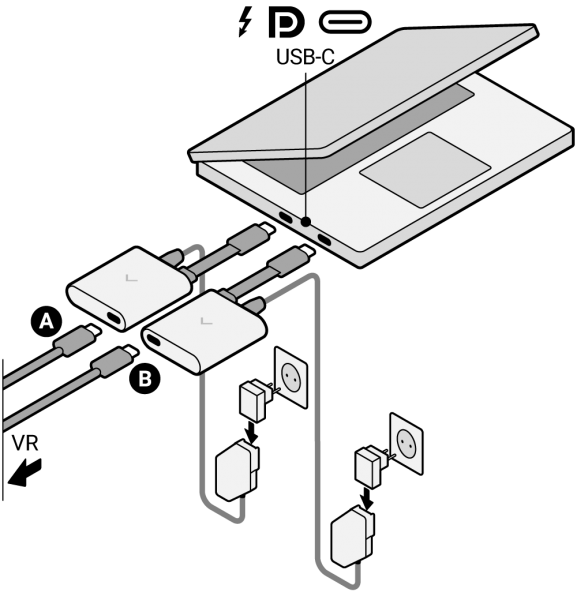 |
6. Connect your headset
A. Two headset adapters Headset cables (A) and (B): Connect each cable to a headset adapter. Headset adapters: Connect each adapter to a DisplayPort port on the graphics card and to a USB-A 3.0 / 3.1 port on the motherboard. Power supply units: Connect each unit to a headset adapter and to a power source using one of the included power plugs. B. Two headset adapters with two third-party Mini DisplayPort–DisplayPort adapters This cabling option is for laptops with two Mini DisplayPort ports routed directly to the GPU. You can use this option if two headset adapters were included with your headset. Headset cables (A) and (B): Connect to the headset adapters. Headset adapters: Connect each adapter to a Mini DisplayPort port with a Mini DisplayPort–DisplayPort adapter and to a USB-A 3.0 / 3.1 port on the laptop. Note that the Mini DisplayPort–DisplayPort adapters must support 8K video and DisplayPort 1.4 with Display Stream Compression (DSC). See the list of tested and compatible adapters. Power supply units: Connect each unit to a headset adapter and to a power source using one of the included power plugs. C. One headset adapter Headset cables (A) and (B): Connect each cable to the headset adapter. Headset adapter: Connect the adapter to two DisplayPort ports on the graphics card and to two USB-A 3.0 / 3.1 ports on the motherboard. Power supply unit: Connect the unit to the headset adapter and to a power source using one of the included power plugs. D. One headset adapter with two third-party Mini DisplayPort–DisplayPort adapters This cabling option is for laptops with two Mini DisplayPort ports routed directly to the GPU. You can use this option if only one headset adapter was included with your headset. Headset cables (A) and (B): Connect to the headset adapter. Headset adapter: Connect the adapter to two Mini DisplayPort ports with Mini DisplayPort–DisplayPort adapters and to two USB-A 3.0 / 3.1 ports on the laptop. Note that the Mini DisplayPort–DisplayPort adapters must support 8K video and DisplayPort 1.4 with Display Stream Compression (DSC). See the list of tested and compatible adapters. Power supply unit: Connect the unit to the headset adapter and to a power source using one of the included power plugs. E. Two laptop adapters sold separately in Varjo Store This cabling option is for laptop computers and does not require the headset adapter(s) supplied with your headset. Headset cables: Connect to the laptop adapters. Laptop adapters: Connect to USB-C ports on the laptop. Note that the USB-C ports on the laptop must be routed directly to the dedicated NVIDIA GPU and include support for Alternate Mode. Power supply units: Use the power supply units included with your headset. Connect each to a laptop adapter and to a power source using one of the included power plugs. |

|
7. Update your headset firmware if prompted
|

|
8. Enable OpenXR runtime if prompted
Enable the runtime if you want to run OpenXR applications. We recommend that you also enable Software updates and Crash reporting. |

|
9. Optional: Connect your headphones
For applications that include sounds or voice input, you can plug in your headphones on the left side of the headset. Headphones with a standard 3.5mm audio jack are compatible with Varjo headsets. If necessary, see instructions on how to select the correct audio output and input source on your Windows computer. |
|
10. Set up tracking Continue setup by selecting a tracking method for your headset. The Varjo XR-3 and VR-3 headsets support the following tracking systems:
|